DIY Putting Aids: 6 You Can Build at Home (and Where They Fall Short)
The best DIY putting aids you can build at home for a few bucks — a tee gate, a path board, a start-line string — plus the one thing no homemade putting aid actually trains.
You don't need to spend a dollar to start practicing putting with real feedback. A good DIY putting aid can train your start line and face control on the carpet tonight. Below are six homemade putting aids you can build in minutes from stuff you already own — ranked by what they actually fix — plus the one gap every DIY putting aid leaves wide open.
What a putting aid actually has to do
Every putt comes down to three things: start line (does the ball launch where you aimed), face control (is the putter square at impact), and pace (does it finish the right distance). A homemade putting aid is only worth building if it sharpens one of those. If it doesn't, it's a craft project, not practice.
1. The tee gate — free (start line + face)
Push two tees into a mat or the carpet just wider than your putter head, about a foot ahead of the ball. Roll putts through without clipping either tee. Clip the right one and your face was open; clip the left, it was shut. It's the single best DIY putting aid because it trains start line and face square at once, with instant feedback.
2. The 2x4 board — about $3 (stroke path)
Lay a straight 2x4 on the ground just outside your putter heel and stroke alongside it without bumping it. It builds a straight-back, straight-through path and kills the wandering stroke. A length of scrap wood or a level works just as well.
3. The chalk line or string — about $2 (start line)
Snap a chalk line on a mat, or stretch a string between two tees over the hole, to give yourself a visible target line. Set the ball on it and roll putts straight down it. It's the cheapest way to check that your eyes and aim actually agree.
4. The mirror — about $10 (eyes + shoulders)
A small acrylic mirror (or putting mirror offcut) under your eyes shows whether your eyes are over the ball and your shoulders are square. Setup errors cause more misses than stroke errors, and this is the only DIY aid that exposes them.
5. The coin — free (face at impact)
Set a coin a few inches ahead of the ball on your line and try to roll the ball over it. A square face sends it across the center; an open or closed face slides it off the edge. Free, brutal, honest face feedback.
6. The pace ladder — free (distance)
Drop coins or tees as distance markers at 10, 20, and 30 feet and try to finish each putt beside its marker, not at a hole. It's the closest a DIY setup gets to training pace — which matters, because distance control, not line, is what causes most three-putts.
Where DIY putting aids fall short
Homemade aids are a great place to start, but they share the same ceiling:
- They drift and wear out. A 2x4 warps, chalk smears, string sags, tees move. Your "reference" changes between sessions, so your feedback isn't consistent.
- They train line, not pace. Almost every DIY aid works on start line and face. None of them actually calibrate how big a stroke equals 20 feet — so pace stays a guess, and pace is what saves the three-putt.
- No repeatable face read on a real roll. A coin helps, but you're eyeballing it. There's no surface the putter head tracks against rep after rep.
- Teardown every time. Loose parts mean you rebuild the station each session, so most people stop.
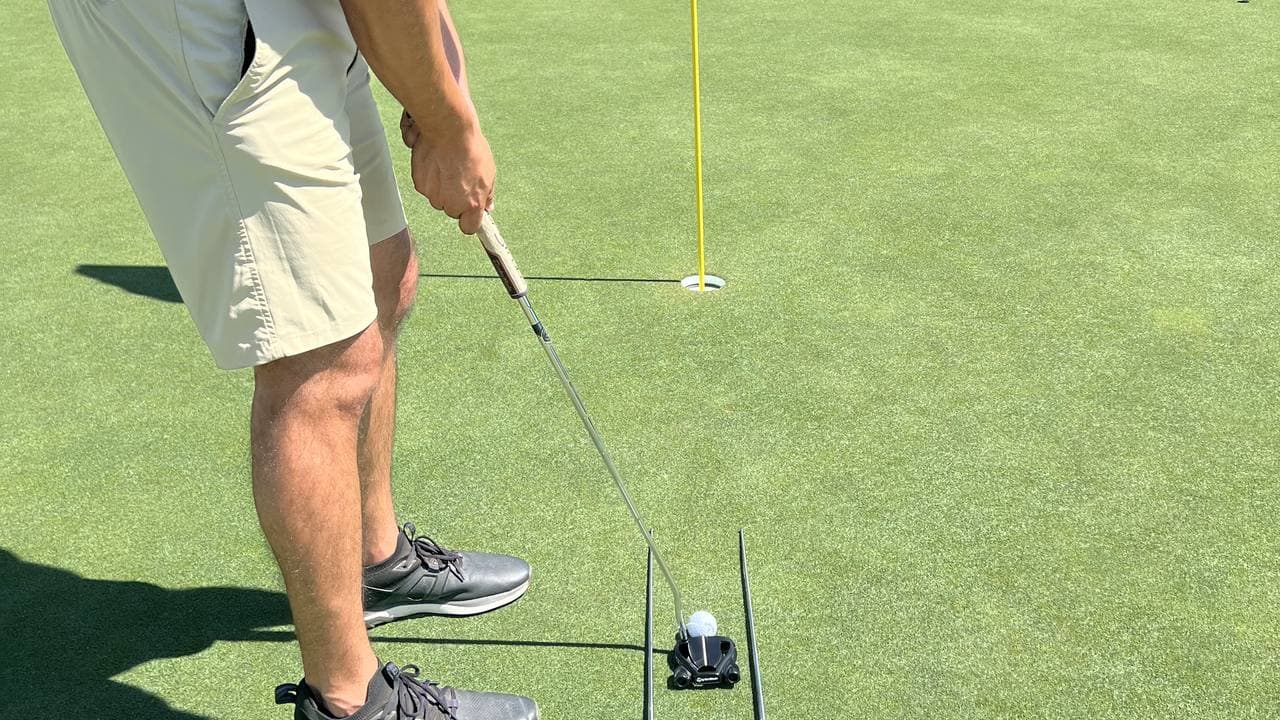
From DIY to dialed-in
If you've already built the 2x4-and-string version, you understand exactly what AimPutt is: the precision version of the aid you were trying to make. It's a 36-inch 6061-T6 aluminum bar that collapses the gate, the board, and the string into one true surface that never warps:
- The top rail trains stroke path and a square face — the gate and board drills in one reference.
- The bottom rail carries a laser-etched pace chart that maps backswing length to roll-out distance — the one thing no DIY putting aid trains. That's the skill that separates good putters: tour pros don't make 30-footers either, they just never leave themselves a hard second putt.
Ten minutes a day, on any flat surface, indoors. It's the homemade aid you'd build if you had a CNC machine and a putting obsession.
DIY putting aid FAQ
What's the best DIY putting aid? The tee gate. It's free, takes ten seconds to set up, and trains start line and face square at the same time with instant feedback — the two things you can't see in your own stroke.
How do I make a putting aid at home? Start with a tee gate (two tees a putter-head apart) and a straight board along your toe line for path. Add a string or chalk line for start line and a coin for face feedback. That covers everything except pace.
Can a homemade putting aid actually lower my scores? Yes — for start line and face control. The gap is pace and durability: DIY aids don't calibrate distance, and they drift between sessions, so progress is harder to keep.
What household items can I use to practice putting? Tees, coins, a scrap 2x4 or level, a length of string, and a small mirror. That's a full line-training station for under five dollars.
Is a DIY putting aid as good as a real one? For training line, a tee gate rivals anything. Where it falls short is pace training and consistency — a fixed, machined reference repeats exactly every time, and a built-in pace chart trains the distance control no homemade aid does.
Done duct-taping a practice station together? Join the AimPutt waitlist and be first in line when Phase 1 launches.
Related reading: 7 Putting Practice Drills That Actually Lower Your Scores · How AimPutt Works